• Hello Guest, welcome to the initial stages of our new platform!
    You can find some additional information about where we are in the process of migrating the board and setting up our new software here

    Thank you for being a part of our community!

B230FT sheetmetal intake (2016-2021 bump)

nathaninwa

The Beloved Oarnge Juice
300+ Club
Joined
Aug 19, 2009
Location
WA
Hello fellow TurboBrickers. (moderators, was not sure of a good location for this post)

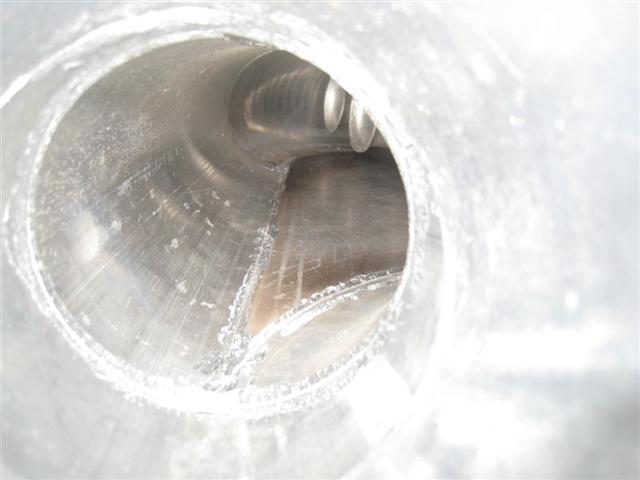
(These are current pics from page 12)

0101002246.jpg


1231091627.jpg


1225091004.jpg


1106092006.jpg


Been designing and getting all the parts built for a sweet sheetmetal intake manifold. Almost ready to start the tacking and welding with only the plenum to bend and shape out, in the pics youll see the plenum back wall is shaped with internal velacity stacks that are up off the wall to help promote air flow. The manifold base and stacks are made from 1/2 alum with pipe runners, the back wall is 1/8 and the plenum will be .100 to save on some weight. I am using a 960 TB with a tapered intake runner for that too. Maybe hard to decipher in the pic but I think you guys will be able to visualize it. There is a pic of a brown paper with a injector on it, if you look close you will see the end result of the shape of the intake. i got plenum volume close to 1.5 times engine (will measure exact when finished as the length changed.) Its still a side mount setup with the stock dimenstions in mind so hopefully this will bolt on and use all the factory parts like the throttle cable and setup.

I have on order a reamer to drill out the fuel rail and have plans on running a toyota style FPR (drill and tapped rail with oring seal) Still not sure what Ill do with the fuel lines but Ill get that figured out soon. So far, a little tweak on the oil dipstick tube and small spacer to bolt it back on the block. My goal is to make this a plug and play and make a TB mount for a 960, 940, or whatever is desired. I have an intake started for me and have parts to build 2 more. Im excited to get these started. Might fire the TIG up this weekend and lay some beads down.

Ill post more pics as the manifold moves on.
 
Last edited:
To much fancy ****

Our ghetto one is going to work damn near as good


LOL, its the old minitrucker in me! Been fabbing and welding alum for almost 16 years now. I have quite a few intakes under my belt and the first one I did I would not say it was fancy at all! But it worked, would I tell poeple I grafted a TB onto the front of a 7mgte one, hell no, but it paved the way to whats going on today.
I would like to dyno with stock and then mine to see what the bolt on power is.

I think I would like to start building these to sell, maybe one or 2 a month. i tried to keep all the fab process's down to simple, and spent lots of time getting the jigs right to duplicate the flanges and stacks, thats why it looks like a roller coaster and not 4 individual pcs

I still need to get jigged up to drill the base for the injector bungs and decipher how many vacuum ports I need to tap into it.
 
Seems like a decent start. I wish we had more threads like this here, so thank you. :)

The velocity stacks seem more like a 1/2" flange with a radius cut into it though... I'm not sure it's doing much but I'm sure it's better than nothing!


:cheers:
 
My one pc velocity stack is for simplicity, production. The roller coaster is 1/2 inch thick with a 1/4 radius on the outside, the intake runners will be welded in with a 1/4 inch fillet and then a 3/8 radius on the inside....not a full on true stack, but it does move the intake runner off the back wall where the air does not like to move as fast. The last intake for a starion I did, the stacks were individuals and a pita the get shaped. Im hoping with a sale of one intake I can get my Smithy 3-1 back up and running and a few more options, possibiltys will open up, until then, I have a bandsaw and a router!

My ultimate goal is to shrink the plenum in length and do a tapered runner design to get some sexiness to it, and to form out some tapered runners to give it a ram effect....some builds a few dyno runs will tell me what to do.

I like Mikes intake runner, had thought about that here. I know it would work on a one off application, and work well. The end thought was if I build these for the public I need a more robust intake tube to support the plenum. Sure I can fab a support bar, but will people bolt them on? I have repaired a few of them Ebay sweet chrome ones with thin ass inake tubes that have almost completly cracked out. I am using 1.5 sched 40 pipe at this point, but will drop down to sched 10 so it can be die form, and maybe rolled out like mikes is on the lathe to about a 180* stack.

Looks like we have some family pictures and Im staying home with the kids later, so it will be way late tonight or tomorrow and Ill get a pic of the setup with it all tacked up.
 
Makes sense.

I bought some Mikuni velocity stacks for mine. They are nice and really cheap, but they're too big. About 50mm ID (I didn't know the exact size then i bought them- I just knew they should be in the ballpark base don the carbs they are used on). I thought that would work out ok with my runners (also using 1.5" sched 40) but it doesn't really so now I need to devise some way of transitioning them. :-(:lol:

I have a plan to taper the runners, going to experiment today. I'm sure I can get it to work some how but for a production manifold it would be too much work.

Looks like mikey should start an intake thread too. :)

We all need to. lol.
 
The tacked up pics are on the same link...Ill weld out the the one later tonight and will need to mock up the plenum next week.
 
Wait I thought that plate was radiused on the inside to act as bellmouths. As it is, it looks like there won't be any bellmouths? I am confused...
 
Dont be confused, after it gets welded, Ill take the router back in there and use the 3/8 bit to radius the inside, beats using the diegrinder and by hand. I had to leave a 1/4 inch fillet so the bit wont take all the material away and start crackin out.....
 
That doesn't make much sense, adding that step, but ok.

I would have made the holes in that plate the same ID as the runners and radiused the inside.

I guess that's what is happening ultimately.

I'll post pics of mine later tonight.
 
That doesn't make much sense, adding that step, but ok.

I would have made the holes in that plate the same ID as the runners and radiused the inside.

I guess that's what is happening ultimately.

I'll post pics of mine later tonight.


Ultamitley thats what is happening, if I was to make the hole smaller and preradius, I would spend more time with the diegrinder matching the stack and runner up. This way the runner is welded on both sides and makes alignment and fitment easier on my end, especially if I start building more of these. Plus, the router is mounted to a table, so it weld, then spend like a minute at the table radiusing the id of the stack.

I do this with my base plates as well, there is a beauty bead on the visible side and its welded on the gasket side and machined smooth, then its a one pc runner with no internal port matching to do.

Ill post more pics to later tonight.
 
OK, just went down to the garage and welded out the one intake base setup.

1107091848.jpg


1107091849.jpg


the outside of the plenum back is not welded yet, I will do that when the other pleunum pcs are fabbed up, it would warp all to heck if i did it now, so no flamin!

Ill get to the router on Monday to shape out the plenum stacks.
 
Back
Top