Khrrck: No photo - filter is gone. It was discolored from dark fluid but no solid bits.
philski o'flood: Socket, universal joint, 10" & 5" extensions.
apachechef: "Re your hind-hind site - you took a symptomless AT apart." You have really boosted my confidance as I didn't realize that removing the pan and replacing the filter would be considered the same as taking the AT apart. The next time I remove the engine valve cover and replace the gasket and maybe boldly adjust the valves, I will be able to claim I took the engine apart.
apachechef: "Re your hind-hind site - you removed a filter that had dirt on it, a filter that did its job and was still doing it's job. it was not clogged, it was not preventing the AT from working." You're correct. But neither you nor I could know and comment on that until after the filter was removed.
apachechef: "Re your hind-hind site - seems like a mental fallacy". Could be but this one will have to take its place among all of the others pretty much being ignored.
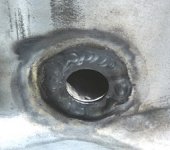
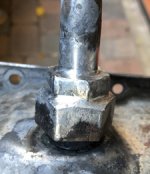
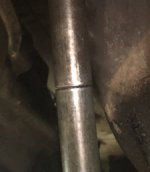
apachechef: "Re your hind-hind site - with a janky welded up nut and a soldered, bent up fatigued pipe, that is much, much more likely to fail". I've attached 3 photos for you and others to evaluate the jankyness of the work and the likelihood of being much, much more likely to fail. The 3rd photo shows the relationship of the upper & lower tube sections after the welding/soldering was completed and the lower tube section was bent/nudged into its final position.
apachechef: "Re your hind-hind site - what would you buy?" The choice is irrelevant as I don't expect to be selling car.
apachechef: "Re your hind-hind site - that 2nd one isn't worth a premium, by far not worth the value of your effort and indeed, much more likely to fail now." Where did you get the idea that my little project resulted in a premium selling point for the car? That conclusion might be considered a mental fallacy. On the other hand, as the AT pan can now be removed easily, perhaps the car now does have a premium feature.
apachechef: "Re your hind-hind site - would anyone here really pay twice the price for the 2nd one?" You are right again, twice the price does seem a bit much for a relatively small modification to the original equipment. Perhaps I should test the market asking just a modest 50 percent premium.
Having driven the car for a few days I must say the car does seem to shift more smoothly when shifting manually and when parked and sliding the shift lever through the gears. This seemingly improved shifting could be just a psychological protection measure or perhaps it is related to the de-rusting of the shift linkage and replacing the bushings or both or neither - I think I could use a mental fallacy now.
lol
buddy, I don't think you got my point.
you didn't know what was going to happen when you started, and **** went south badly, agreed?
In no way am I talking about you selling this stuff.
It is simply referencing what you have now versus what you started with.
apachechef: "Re your hind-hind site - you took a symptomless AT apart." You have really boosted my confidance as I didn't realize that removing the pan and replacing the filter would be considered the same as taking the AT apart. The next time I remove the engine valve cover and replace the gasket and maybe boldly adjust the valves, I will be able to claim I took the engine apart.
"taking apart" - unsealing a not leaking pan, taking parts off of a working AT -"taking apart"
you know this, stop the wordplay.
apachechef: "Re your hind-hind site - you removed a filter that had dirt on it, a filter that did its job and was still doing it's job. it was not clogged, it was not preventing the AT from working." You're correct. But neither you nor I could know and comment on that until after the filter was removed.
INCORRECT a "no issues" AT doesn't have a clogged filter...
cracking open a non leaking pan to "fix" a "no-issues" AT? hmm.
listen buddy, to help you imagine things and see it clearly, and maybe see "sunk costs" fallacy, and maybe figure out some non-concrete thinking...
have ya heard of hypothetical questions helping clear up complex issues?
suppose you crashed your car.
and you bought another AT car with a "no -issues" trans, just like you had at the start, unknown insides, would you follow the same path as you did with your last "no issues" trans?
would you leave it alone, change the fluid and enjoy another 134k miles?
would you swap in your cobbled up trans with the "fixed pipe" and a known clean filter?
me, I'd take a fresh fluid, no issues, no leak AT with an unknown filter, intact filler pipe over yours with the welded/soldered pipe, even if someone offered to swap it in for free.
but hey, to each his own, I hope you enjoy another carefree fruitful 134k. Peace.
not attacking, just trying to help the next guy in your position make a good decision after reading your thread.
a parting question to ponder.
when you examined the filter of your "no-issues" trans, what you saw compelled you to replace the filter and keep using the trans.
what could you have seen that would have changed that outcome?
if it was clean, you would have kept using the trans too right?
if it was much dirtier, would you gotten a new trans?
if it had a few chunks, would you gotten a new trans?
After you drained the fluid, and found it was dark, but chunkless, glitter free and without sandy residue, you looked back up at it and thought " I need to examine the filter, and that test of eyeballing the filter, will determine what I do differenjtly."
what were you going to do differently according to the possible test outcomes?