• Hello Guest, welcome to the initial stages of our new platform!
    You can find some additional information about where we are in the process of migrating the board and setting up our new software here

    Thank you for being a part of our community!

240 Butt Cheek/Wheel Arch Repair

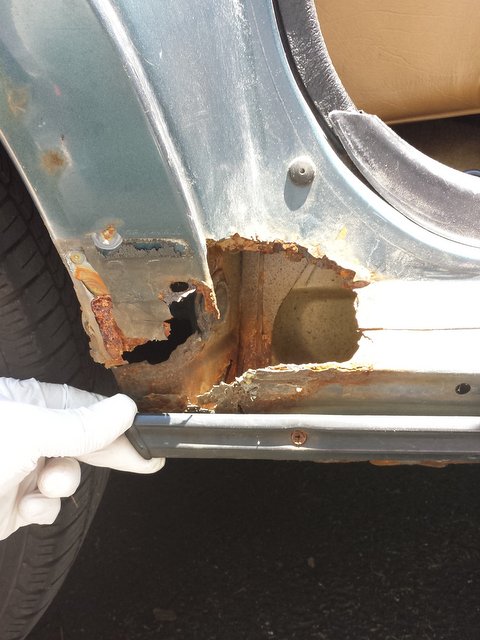
My motivation to get this car back on the road is strong, but my goals seem to have been very unrealistic. My word of advice would be to gather as many of the materials as you can before you start a project like this. Being at the stage I am and needing to wait two weeks for paint really sucks! Luckily I still have some other odds and ends to take care of on this car while I wait.

E13uztK.jpg


2PNQP8b.jpg
 
Yes, this thread is inspiring. I keep waiting to see the attachment of the wheel arch before it gets painted, from about 10 feet.:nod:

What do you mean? Is there an angle I haven't shown yet? The outside portion of the arch is still in bare metal. Or were you wanting to see the whole arch? I'm a little restricted because of the garage size, but I'll try to get you an idea!
 
Oh yeah, I may have also be trying to hide the fact that the back of the rocker panel is a mess too. :oops:. Cats out of the bag now. I'm just not digging into that can of worms yet.
 
^ Good candidate for a hack and pack. Sheet metal, pop rivets and fiberglass bondo.
 
No chance you could be embarrassed if you were to compare your work to mine:

I'd laugh, but that was option two for this car! Body work sucks. I have some serious respect for the guys who do this for a living. They are artists, and the work is messy. I don't look forward to doing this again, but I'm afraid its inevitable due to my location.

Anyway, here's a view from further back. It's the best I could get. I'd like to show the transition from the wheel well to the quarter panel because I think it turned out well, but without a lift I have a hard time being under there and holding the camera just right.

PtNQVETl.jpg

I'm happy with how straight I got the patch even though I warped it by welding it in too quickly. I'll remember to slow down if I ever do this sort of work again.
 
Good work saving a nice blue wagon! The rule of thumb that I was taught is two minutes of cooling before welding nearby. With a panel like that to repair. You can always weld somewhere else to let the fresh welds cool. Thanks for showing the way. As these cars get older yet. The cars will need more people repairing metal.
:volvo:
 
I2BDwDDl.jpg


AfF3gbcl.jpg


qbBpzhrl.jpg


vEZnTtGl.jpg


aDboNYIl.png

So the car being partially restored is actually the second 1989 245 DL with 213 Mid Blue in my life! My girlfriend and I both love this combination and would never change it. The first one was my college car and it served me well. Unfortunately, it was much worse for wear than the second wagon and ended up being scrapped. I was unable to beat the rust, but I had not missed any of my other cars combined more than I missed that wagon.

When my girlfriend decided to get one of her own I was ecstatic. In hindsight we got a pretty poor deal on it, but we got almost exactly what we were looking for and couldn't wait to go make more memories. We aren't letting this one get away!
GeGYH1Sl.jpg


riUbg1fl.jpg


8Ix6A9al.jpg
 
What do you mean? Is there an angle I haven't shown yet? The outside portion of the arch is still in bare metal. Or were you wanting to see the whole arch? I'm a little restricted because of the garage size, but I'll try to get you an idea!

My bad. I had assumed you ordered the wheel arch panel to use the whole thing, but your latest pic proves you only needed the smidgen at the rear end of it.

Again, thanks for your detail, and the inspiration it provides.
 
My bad. I had assumed you ordered the wheel arch panel to use the whole thing, but your latest pic proves you only needed the smidgen at the rear end of it.

Again, thanks for your detail, and the inspiration it provides.

Ahhh, yeah. I may regret not using the whole thing later, but it's still here if it ever comes to that. Although there is some rust on the pinch weld going all the way around to rocker panel, it is still pretty solid and in tact. I just cleaned it up to the best of my ability and brushed on some rust encapsulator. This will buy me extra time. I could not justify needing to repaint that much of the car at this time nor spend an entire winter getting this one section of metal right.

These kind of projects snowball very easily, so I chose to draw the line where I did. If I was going to do the whole wheel arch, why not do the rocker panel too? By the way, this is just one side. The other side is still in tact, but it's not rust-free either. Yes, the correct way to get this done would be to do it all at once, but that's just as intimidating and out of the question to me as it is for most DIYers.

I'm going to be honest about my repairs, but I'm glad I can still inspire some people! Rust sucks, but the fact of the matter is that shipping cars from outside of the rust belt is not always practical and it doesn't guarantee a perfect car either. What I can say about this car is that the interior in this car is one of the best I have seen in a wagon. Take that, Texas! I'm confident that this repair will last long enough for the car to live a second life and look good doing it!
 
I finally got some filler on the patch. The warpage is a lot more visible that it was before, but it's not as bad as I imagined. My third layer of Bondo is dry and waiting for sanding.

First layer
9J6fzjJl.jpg


First layer sanded
SPvPU6Tl.jpg


Second layer sanded
oDtiImMl.jpg


Low spots
knJBXigl.png


Third layer
z6Fxp7nl.jpg


Again, this is all going to be covered by the mud flap and trim, so it doesn't need to be perfect. I just want it to be smooth enough to not have craters or sharp lines. Then I will finally paint!

Here's a very basic tip that I think should be mentioned since it I am showing an exaggerated example of low spots. It is important to use a sanding block instead of your hand. It looks like I have missed sanding some areas which is actually sort of true, but its not because my sanding block didn't go over the area. If you use a block you will only sand the highest area under the block which is generally what you want. If I was using my hand, I would also be sanding the low spots which would result in a wavy surface. This is my basic understanding anyway. Maybe a one of pros can come in and correct or expand on this.

I've been using 100 grit to knock down the rough stuff. Once I am happy with the shape of the panel I will knock the grain down with 180 then 220. Those were the recommendations from Bondo except I substituted the 80 for 100 because I tend to be a bit aggressive. I'm pretty happy with how the curved part of the arch is turning out. I thought this section would be more difficult for a newbie like me.
 
Last edited:
I forgot to get a picture of the car after I sanded and before I sprayed more primer on. It's the high-build stuff, so I actually used it to fill some small craters and smooth out some bad transitions from bare metal to original paint. Now I have some questions, so hopefully you more experienced guys are still watching this.

The primer is black, so I tried using white paint as a guide coat. The trouble is that the can I had has a newer style nozzle on it that pretty much makes it an on or off switch. I can't throttle it so that it only spits little dots on the unsanded surface like I want. It's been over ten years since I learned that trick so I'm surprised I remembered to do that at all. Is there any special technique or do I just need more careful hands?

Also, I'm almost to the point where I need to start worrying about the blend into original paint. I've seen it done by a professional painter, but he made it look so easy. Am I just supposed to overlap my primer with the base coat? Do I need to wet sand the old paint at all to get adhesion?

Here's how it looks right now.
3TRhUCHl.jpg
 
I was always told to use black as the guide coat even with black primer. Use satin black so you can see the paint well. Not sure about the blend. Been too long since I've done that and like you I had someone helping me.
 
For the blend you do not have to sand but you have to scuff the old paint if you want it bond. I believe the gray scotch brite pad is the smoother one. Could be the red one, double check. If you have wax and grease remover at least wipe everything down with rubbing alcohol. Make sure the white paint you are using for guide coat is FLAT paint. Otherwise it will gum up your sand paper. Just needs a light dusting of paint.
 
Thanks for the input guys! I'm a little disappointed that I warped the metal while welding and was unable to correct it with filler, but overall I'm extremely happy! I cannot believe how awesome of a match this paint is. This was my biggest worry. Automotivetouchup.com will absolutely get my business again when the time comes.

iPXbBESl.jpg
 
Back
Top