• Hello Guest, welcome to the initial stages of our new platform!
    You can find some additional information about where we are in the process of migrating the board and setting up our new software here

    Thank you for being a part of our community!

Our latest '70 145 Project - Need a few things. Any Ideas?

A few puzzling things have cropped up:

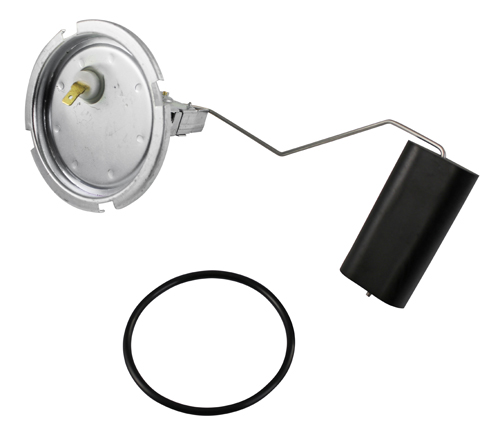
The most puzzling involves gas. About a month ago I topped up the fuel tank. I didn?’t need to but I wanted to benchmark my fuel gauge and usage. It spit out violently when it told me it was full. No problem. I parked it for a week and discovered a puddle under the tank. Fuel was leaking from the fuel sender gasket. An easy fix...I thought. When I received the rubber gasket from VP, I drove around a lot to get the fuel level down enough to change the gasket. The old cork gasket was split so I installed the new one and snugged it down tight. So why is it still sweating gas around the sender? I cleaned it up again and tightened it but it still does it. I removed the charcoal canister up front and was careful not to plug up the hose end in case it is a tank pressure thing. When I remove the gas cap, there isn?’t any ?“whoosh?” sound. Lastly, I?’m down probably 3 or 4 gallons from full.

I had a similar issue on my 71. The sender doesn't ever hit a stop when it seals, it'll just unseal again if you keep turning it. I didn't realize this, because other senders I'd installed had a stopping point that would prevent further turning of the sender unit once it was fully installed.

There should be 6 lobes on your sender that will bite onto 6 tangs present on the hole at the top of your gas tank. I'd remove the sender & make sure each tang is level with the rest of the sheet metal of the gas tank. If necessary, maybe gently bend them down with a soft piece of wood.

Then, this part will be hard to describe, but maybe you'll get the hang of what I'm trying to say... There should be 6 lobes on the sender. So, every 60 degrees of turning during installation will set you right back to where you started. Therefore, you need to install the sender by placing it in the hole of the tank and then turn it exactly 30 degrees.

I'd maybe take a sharpie and mark a zero on the sender & tank with the sender placed in the hole, then remove sender & use a protractor to mark 30 degrees of rotation onto the tank. Then reinsert the sender, and turn it until the previously made mark lines up with the 30 degree mark on the tank.

If you look at my build thread, I had the exact same problem. I over-rotated the sender during install to where it was still seated but not sealed.
 
For the vent windows, I think you really need to use an adhesive for rear view mirrors. Permatex has a product specifically for this: https://www.permatex.com/products/s...repair/permatex-rearview-mirror-adhesive-kit/

Ditto on the Permatex rearview mirror kit. I used it to reattach the clip on one of my vent window two or three years ago and so far it is holding fine. However, the Permatex is an acrylic product and JB Weld products are typically epoxies. Unless you can remove all traces of the JB Weld from the clip (it probably did not stick to the glass) you likely will not get a durable bond with the Permatex or any of the other products.
 
Unless you can remove all traces of the JB Weld from the clip (it probably did not stick to the glass) you likely will not get a durable bond with the Permatex or any of the other products.

Both of the wind wing latches on my 145 had come off and were in the glove box at the time of purchase. I used inside rear view mirror adhesive to re-attach. As mentioned by 142guy it is imperative that both surfaces are clean and flat to make the repair work. Use a razor blade to remove any old adhesive residue from both surfaces before attempting to reinstall. After scraping / chiseling off the all of the old adhesive material clean both surfaces thoroughly with acetone. Then daub on the accelerant followed by a drop of the fresh mirror adhesive on the latch.

Let it sit without tension overnight before using as a precaution.

Note: I put a dot of tape on the outside of the window to define the location for the latch so that I was confident that I got it located in the proper position.

This method worked for me.
 
Thanks to all responders!

I did lots of research and was led to believe that JB Weld was superior in this application. My procedure is similar to responder "escondidoron" so all I have to do is order some of the right stuff.

I'm a little confused by the procedure suggested by Iansplatinum on the sender gasket. I'm able to tighten the screwss until it is super tight and the top is almost flush with the top of the tank so the rubber gasket is squashed down nicely. I checked yesterday and saw no more sweating so perhaps I got it tight enough. We shall see.
 
It's been a while but I seem to remember just turning the sender until it stopped, not having to calculate how far to turn before it loosened again.

I <i>do</i> remember my eyes watering from the gasoline fumes in the cabin before I replaced that o-ring.
 
I'm a little confused by the procedure suggested by Iansplatinum on the sender gasket. I'm able to tighten the screwss until it is super tight and the top is almost flush with the top of the tank so the rubber gasket is squashed down nicely. I checked yesterday and saw no more sweating so perhaps I got it tight enough. We shall see.

Huh, screws?? I thought the 70 sender installed similar to the 71-72 sender, just a different size and different gasket...

Here's some pics of early senders installed.... no screws. Sounds like someone finagled your sender at some point in time. They're supposed to be twisted into place.

https://bringatrailer.com/wp-conten...olvo_142_1581959345664b77b5303f49DSC_8691.jpg

https://bringatrailer.com/wp-conten...olvo_142_1568413631e7dff9f98764daIMG_0729.jpg

It's been a while but I seem to remember just turning the sender until it stopped, not having to calculate how far to turn before it loosened again.

I <i>do</i> remember my eyes watering from the gasoline fumes in the cabin before I replaced that o-ring.

If you twist until it gets tight, it will seal but it is possible to keep turning and then undo it. That's what I did and then it overflowed when I filled up at the gas station. Here's a pic of a new sender, it has 6 half circles that apply pressure on the gasket by biting tangs on the tank. You'll notice that there is no "stop".

687826.jpg
 
Last edited:
Now, hot start problem.

As a refresher, both Zeniths are rebuilt by pros, I have a rebuilt Bosch distributor with Pertronix and a Pertronix coil. Added new spark plugs an wires. It starts reasonably well when dead cold with a pull on the choke. When it is hot and I try to restart, it cranks but doesn’t fire. Then I get frustrated and flood it so much that gas drips out out the front carb. I left it alone for a while then I pulled the plugs to clean them off. All 4 were clean and a perfect tan color.

I am new at this so what I should I consider tweaking?

What is your hot starting process? I have never driven a car with Stromberg or SU carbs; but, it is common with carbs that when hot you need to press the throttle pedal down slightly to admit more air during cranking.

I am curious about the flooding bit. Neither SU or Strombergs have accelerator pumps so the typical source of hot flooding (repeated pumping of the pedal) does not exist. You would have to quiz a Stromberg expert; but, gas dripping out the front carb seems more like a float level problem (how expert was your pro rebuild?). Perhaps you have a problem with some dirt in the float valve which is preventing the float from shutting off the fuel supply? Higher than spec fuel levels in the float chamber will cause rich running - all the itme.
 
Gas tank blues...again.

I am attempting to get familiar with this 145 but it still hates me. The hot start issue is gone so that makes me happy. The fuel tank leak or should I say fountain, still persists.

The fuel gauge doesn?t really work so I went to the gas station to fill up so I could benchmark mileage and see if the gauge was really off. To remind you or first time visitors, I replaced the sender gasket and snugged it down tight (the screw type). I filled the tank slowly and the hose shut off like it should. I drove about 3 miles and decided to check it. Well there was about 3/4 of a gallon of gas in the well surrounding the tank. My mechanic friend suggested fuel is getting pushed through the screws since the are outside of the gasket. He thought putting some RTV on the threads could seal it.

But why is this happening? Could it be a venting problem?
 
I am attempting to get familiar with this 145 but it still hates me. The hot start issue is gone so that makes me happy. The fuel tank leak or should I say fountain, still persists.

The fuel gauge doesn’t really work so I went to the gas station to fill up so I could benchmark mileage and see if the gauge was really off. To remind you or first time visitors, I replaced the sender gasket and snugged it down tight (the screw type). I filled the tank slowly and the hose shut off like it should. I drove about 3 miles and decided to check it. Well there was about 3/4 of a gallon of gas in the well surrounding the tank. My mechanic friend suggested fuel is getting pushed through the screws since the are outside of the gasket. He thought putting some RTV on the threads could seal it.

But why is this happening? Could it be a venting problem?

See my earlier post:

Huh, screws?? I thought the 70 sender installed similar to the 71-72 sender, just a different size and different gasket...

Here's some pics of early senders installed.... no screws. Sounds like someone finagled your sender at some point in time. They're supposed to be twisted into place.

Sounds like someone added screws to your sender which would undoubtedly cause a leak. Volvo would never have engineered a metal screw into a sheet metal tank to seal out pressurized hydrocarbon.

Post Pictures of your sender area so we can confirm that this is indeed your issue. It does not sound like a venting issue. Gasoline sloshes around in the tank like an above ground pool in an earthquake. If there is anything less than a perfect seal, it will overflow and give you a nice moat of liquid Barney.

Here's when it happened to me about a month ago:
http://forums.turbobricks.com/showpost.php?p=6073389&postcount=39
 
Last edited:
Make sure you have the correct sender and the correct gasket. The sender, gasket (and tank) up to 1970 is different from the 1971-72 unit. The one in the photo linked by IansPlatinum is the 1971 + sender. If that is what you have then you have the wrong sender for your 1970 - assuming you still have a 1970 gas tank.

This is the correct sender for up to 1970 (with the significantly different gasket)

https://classic-volvo.com/fueltankfloat-140-164-for-volvo.html

There should definitely be no screws in the top of the tank.

You guys are all correct. Someone in the 145's past had a spare fuel sender from somewhere and decided to modify the tank by drilling holes in it to adapt this unit. So, naturally, it leaks from the screw holes that should NOT be there. So I need to find a different tank or my car will be tied up for a long time (drain tank, send it out to be resealed, weld holes, grind it flat and pray. No thanks)

I'll post a Wanted Ad and see what shakes out. Thanks all.
 
Good luck with finding a new tank. When I resto modded my car 6+ years ago reproduction 140 tanks were not available. I don't think that situation has changed.

Without knowing the details of your damage, I would be inclined to drain and remove your existing tank and send it to a rad shop (typically the guys who are prepared to do these types of repairs) to have the holes soldered up (soldering is usually the repair technique rather than welding) and if required the tank cleaned and sealed. If the shop is experienced patching up some screw holes will be a non issue. If you give them a fuel gauge sender that can be made to seal they will typically pressure test the repair to confirm that it is good before sending it home. You should be able to get a 1 day turn around unless they are really booked up.

Any tank that you can find from a salvage 140 is likely to have issues that at the very least may require cleaning and sealing. It will likely be faster to remove and repair your tank rather than try and find a replacement, do the unknown restoration work on it and then reinstall it.

Do you have the 1971+ fuel sender? If so, its likely that somebody needed a new sender and the 1970 and earlier senders were out of production so they tried to make a 1971 sender work (or cobbled some other mystery sender). If the sender retainer ring on your 1970 tank appears to be relatively un-mangled I would be inclined to source a replacement 1970 sender and gasket and have it test fitted to your tank to make sure that it seals. You may have to check around because not everybody has them in stock.

I found a good used tank from Don Theibold of P1800.com. If he says it?s good I trust him. I will have it cleaned and sealed before it goes in. I have the proper sender coming from VP-Autoparts. I?ll check all the hoses and vents while the tank is out.
 
Finish one thing and find 2 more to things replace it. Well, that's sort of where we are at. But it is only January and my plan is to be roadworthy by April Fools Day. Every pun intended with the selection of my date of completion.

Friday, we put the rebuilt front Stromberg in place and installed the rebuilt distributor now loaded with a Pertronix 1847 kit. So it wouldn't surprise you at all to hear that we couldn't find the rotor anywhere. Earlier in the day, we were at Custom Spares in Brewster, NY to pick up a Pertronix coil. If you live in the area and never heard of them you will be amazed by the inventory that Stuart has amassed over the years (http://customsparesltd.com/). A missed opportunity to get a rotor if I knew I needed one.

Well, the delay in starting the car for the first time led us to fix some electrical issues. That is where the tailgate hinge wiring issue I spoke about raised its ugly head. While my friend, Mike, worked to sort that out, I removed the vent windows to reinstall the top pin and original vent window locks. That went well and everything works as intended.

The Blaupunkt AM radio isn't working so I sent that off to Vinatgeblau in New York for diagnosis and repair (http://www.vintageblau.com/repairs.html). I replaced the interior light bulbs with 10W festoon bulbs and removed the interior rearview mirror because I found a NOS mirror through Don Thibault. Side mirror replacements coming from VP Auto Parts.

My friend and former colleague at Volvo Cars of North America gifted me with a complete and perfect copy of the Competition Services binder. Every item, part number, and illustration is there and it hurts to know I probably won't be able to find any of them!

Vent-Windows-e1579976530911.jpg


Comp-Services-e1579977726461.jpg

Just for info, Amazon cars in the U.K. sell a 3D printed hinge and clip which makes the vent windows solid rather than a window you can open. Deletes the need for the glued on lock.
 
With the engine cold, remove the cap and siphon coolant out of the over flow bottle until the level is slightly above the bottom mark on the bottle (about 50 mm from bottom if the level mark is not visible). Put the cap back on, start the engine and let it come up to operating temperature. The coolant should come up to around the mid point or slightly above when the engine is up to normal temperature. Adjust by filling or siphoning as required. You don't want the level getting too high because you want to leave some extra expansion room for those hot days when you come off the highway and immediately hit a red light. You loose a lot of cooling power when the car isn't moving and the water pump has slowed down and with a really hot engine block the temperatures will go up and the coolant is going to expand. If there is not enough hot expansion room left you will get 'the burp'.

You have been driving the car a bit already so you should not have to go through the cooling system purge that is required after a coolant change. In future, any adjustments to the cooling system level should be done by adding / deleting from the over flow bottle to maintain the correct warm engine level. Do not top up from the rad cap.

Getting the coolant bottle level correct should fix your problem. If you find that you are still venting some fluid / vapour from around the top of the coolant bottle the pressure cap on the bottle may be faulty; however, my 1971 cap is original and continues to work just fine. The cap on the rad is just a cap - no pressure release mechanism. If it leaks at the rad cap then the rubber seal in the cap has failed. You can buy new caps; but, some of them have a problem. The tangs on the cap are formed incorrectly and the caps will not seal completely. If you can find some sheet rubber gasket material you can cut a new seal for your old rad cap. You may have to shim it a bit to insure a tight seal.

Jack up the front of the car as high as you can as well will help get rid of any air bubbles.
 
Just for info, Amazon cars in the U.K. sell a 3D printed hinge and clip which makes the vent windows solid rather than a window you can open. Deletes the need for the glued on lock.

I can't imagine making the choice to not have functional vent windows in my '71. I love the feeling of opening a vent window and feeling the sudden blast of air from the footwell vents. They also don't let in much water when it's raining.

I used the 3M mirror glue after cleaning with acetone, and they're still going strong after one year.
 
Hot start issue...

If you follow this thread this may have some old news in it.

I own (or should I say it owns me) a ?70 145 with Dual Strombergs. They were rebuilt, added Pertronix, Pertronix coil, rebuilt Bosch distributor, new plugs and wires. Cold start is fine with manual choke but hot start requires the ?foot to the floor? strategy the owners manual recommends. Here is the curious part, after the hot start, it drives okay but if I have to stop shortly after the hot start it won?t idle and stalls. After a few miles without stopping, it is fine.

Crazy.

Sounds like heat soak in the carbs boiling fuel. My HIF's would do it once the engine was warm after a brief highway stint sitting at a stoplight. Go to pull out, falls on its face. Foot to the floor until it cleaned up and away I would go.
 
We purchased the 145 a few days ago from the eagle-eyed seller who could recognize solid bones under a pile of junk. He rescued the 145 from a place where it rested since '89. The seller rebuilt the motor, did all of what you are supposed to do to resurrect a sitting car. He then embarked on reclaiming the luster of the original paint!. He left things for me to do like refinishing a fender and under the grille, polishing and buffing trim, adjusting and test-driving and more adjusting.

I want to find a removable roof rack and a source for new bottom seat cushion foam. Any thoughts? I've also ordered $450 worth of lighting upgrades from Daniel Stern Lighting. He sells only the best and I have never regretted my purchase.

Eggie-as-found.jpg


egg_Rear-three-quarter_o-e1572281259345.jpg

Any updates here?
 
Back
Top